Scrollspying made easy with the Intersection Observer API.
Learn how to easily update a navigation based on the scroll position without listening to the scroll 😎.


The web capabilities have been evolving rapidly, and as a consequence webpages have become longer and longer as they've transformed into the main medium for businesses and brands to flex their storytelling muscle and express their branding and messaging in a unique way. Here you can see some examples:
- Apple 13 Pro with +53,000 pixels to scroll
- Google TV with +29,000 pixels to scroll
- Pixel 6 Pro with +30,000 pixels to scroll
Those are a lot of pixels to scroll through, right? So this is where the Scrollspy has become an alternative to provide the user a better experience and display the content in a more structured way, sectionalizing the page, making it easier to know in which section they're in by just a glance.
What is a Scrollspy navigation?
It's a navigation that usually is fixed on the viewport (to the top, bottom, right, you name it), containing links mapped to sections on the page that get updated to an active/inactive state based on the visible section on the viewport as the user scrolls.
Let's use this graph as an example where you can see a very long page with several sections (A, B, C, D, etc.) and a fixed top navigation showing which section is active.

The approach
There are infinite ways to achieve this when it comes to code, but I think we can categorize them into two buckets: listening to scroll and not listening to scroll.
👂 Listening to scroll
Usually Scrollspy implementations would imply listening to scroll to check which section is visible and then tie that up with the corresponding navigation item. But as we already know, that's an expensive event to listen to, so if you're up for the challenge, you need to take few things into consideration1.
A very well done example would be what you get with Bootstrap (a pretty popular framework for building responsive UIs). It provides a Scrollspy out of the box, and as expected, in their source code you'll see that they're listening to the scroll to achieve the goal.
Update–Apr, 2022: Bootstrap has updated the Scrollspy to avoid listening to scroll. Here's the commit.
✅ Not listening to scroll
This is what this post is about. The aim is to achieve the same thing we just explained above but as simple as possible and avoiding expensive events like the 'scroll'. This is when the Intersection Observer comes handy. So let's jump right in.
🦸🏼♀️ Intersection Observer to the rescue
If you're not familiar with the Intersection Observer I highly recommend you giving a quick read to this graphical introduction to the Intersection Observer API. This way you'll get the basics that will help you to follow along. So before we can start squeezing the juice out of the Intersection Observer, we need to set the stage for it to work. So–as always–let's implement a simple HTML/CSS structure.
Basic structure
The sections
We're going to emulate a very, very long web page so here's the proposed structure for tall sections stacking on top of each other.
HTML
<article id="a">A</article>
<article id="b">B</article>
<article id="c">C</article>
<article id="d">D</article>
<article id="e">E</article>
<article id="f">F</article>
CSS
article {
  display:grid;
  font-size: 12rem;
  height: 100vh;
  place-items: center; // <-- 😎 nifty trick to center both vertically and horizontally.
}

article:nth-child(odd) { // <-- Just to differentiate each section.
  background: #eee;
}
The navigation
Now we're going to create a navigation, fixed to the top, always visible and that contains links that correspond to each section on the page.
HTML
<nav>
  <ul>
    <li><a href="#a" class="active">A</a></li>
    <li><a href="#b">B</a></li>
    <li><a href="#c">C</a></li>
    <li><a href="#d">D</a></li>
    <li><a href="#e">E</a></li>
    <li><a href="#f">F</a></li>
  </ul>
</nav>
CSS
nav {
  background: #000;
  left: 0;
  position: fixed;
  right: 0;
  top: 0;
}

nav ul {
  display: flex;
}

nav ul a {
  color: #fff;
  font-size: 4rem;
  opacity: .5;
  padding: 2rem;
  text-decoration: none;
  transition: opacity .2s linear; // <-- Nice touch to animate opacity.
}

nav ul a:hover {
  opacity: .8;
}

nav ul a.active {
  opacity: 1;
}
Global updates
Jump links work great, nevertheless to make this even smoother I am going to add the scroll-behavior property to the html to change from an abrupt jump to a smooth scroll.
CSS
html {
  scroll-behavior: smooth; // <-- 😥 Poor support on Safari.
}
Ok, so we have something that does 80% of what's needed and not a single JavaScript line has been written. So let's list our marvelous achievements:
- ✅ Each anchor link has an
hrefstarting with#which will connect them to the respective section on the page - ✅ The item's opacity is what's getting animated on hover or when the
activeclass gets toggled. This is to avoid re-paints - ✅ Just by adding the
#matching the sections, we get the nice native behavior to jump to the sections as we click - ✅ By adding the
scroll-behavior: smoothproperty not only the jump links work, but they animate the scroll very smoothly - ✅ The first item (for now) has an
activeclass that differentiates it from the others.The result (with no JS)
Now, as we're not human browsers I've implemented the lines above in a CodePen. Go ahead and play around with it, click each nav item, and feel more familiar with which lines of code are doing what. And if you're not sure, please feel free to add a comment and I'll reply as soon as I can.🪄 The Magic
So let's aim for that missing 20%. We need to add interactivity so when the user scrolls the navigation items update respectively.JS
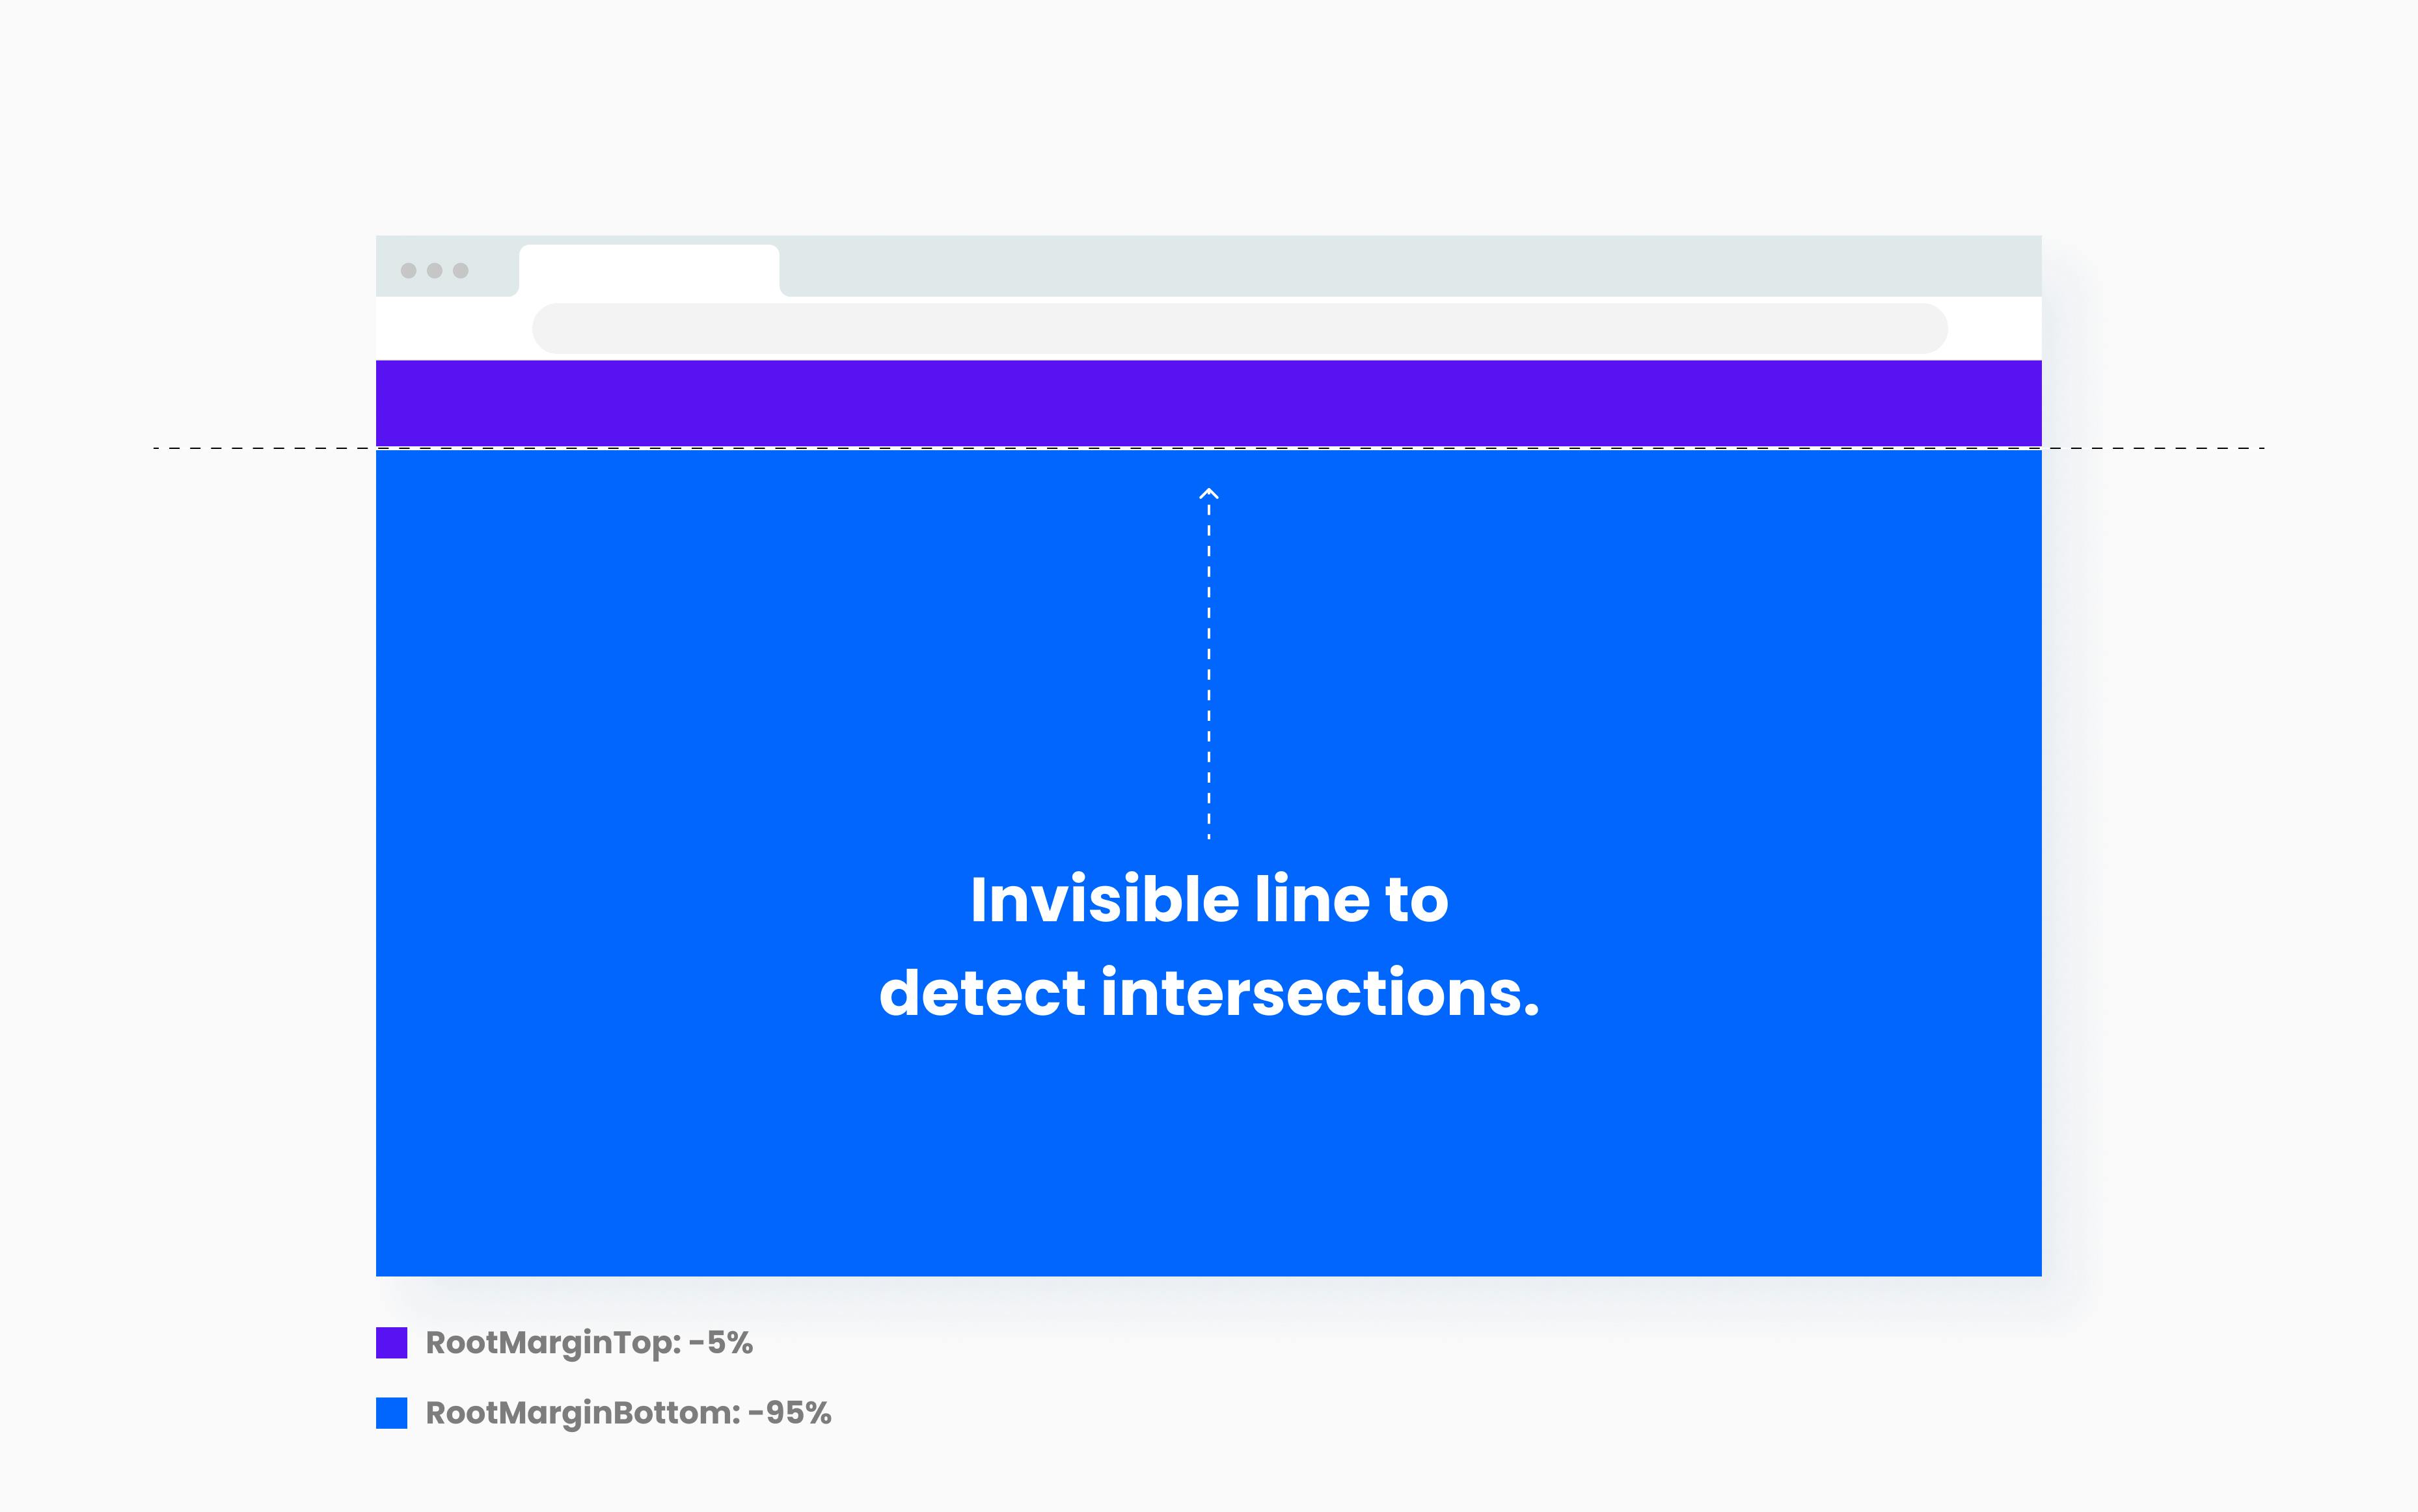
So we need to get a hold of both the navigation and the sections to spy on.const spyNav = document.getElementById("spy-nav"); const articles = [...document.querySelectorAll("article")];spyItemcallback, that's going to get executed every time an intersection happens.const observer = new IntersectionObserver(spyItem, { rootMargin: "-5% 0% -95% 0%", });rootMargin: "-5% 0% -95% 0%". This is creating an invisible line positioned 5% inside the viewport from the top and 95% inside the viewport from the bottom. To make it more graphical:
🤔 But how is this working?
The invisible line created by the negative margins has no height, which means it doesn't exist, right? Well, sort of. What this is doing is creating a checkpoint that only works if the threshold is set to 0. This means that the Intersection Observer will trigger when there's an intersection and the element area is ~0% visible.
The interesting part here is that each section is 0% visible two times. First, when its top part intersects and second, when its bottom intersects. So the differentiation relies on the isIntersecting property of the IntersectionObserverEntry. When the top intersects it's set to true when its bottom intersects it's set to false.
Intersection Observer Callback
The callback contains the secret sauce that powers our Scrollspy so let's review the callback code and how are we leveraging threshold, rootMargin and isIntersecting to make this seamlessly work.
JS
const spyItem = (entries, observer) => {
  entries.forEach((entry) => {
    const { id } = entry.target; // <- Gets the section id.
    const spy = spyNav.querySelector(`[href="#${id}"]`); // <- Query the DOM for the nav item.

    spy.classList.remove("active");
    if (!entry.isIntersecting) return;
    spy.classList.add("active");
  });
};
So when an intersection happens, the callback gets executed, we get the entry and check entry.isIntersecting, and two and only two scenarios can happen:
- Element's top is intersecting–
entry.isIntersectingistrue. This means it's the element on screen that's intersecting so the respective nav item needs to be set to active. - Element's bottom is intersecting–
entry.isIntersectingisfalse. This means it's the element leaving the screen that's intersecting so the active class needs to be removed from the respective nav item.
Zooming in, here's the secret:
    spy.classList.remove("active"); // Always remove the class.
    if (!entry.isIntersecting) return; // Check if it's not intersecting and try to exit early.

    spy.classList.add("active"); // If this line is executing it means that this is the active element.
Of course, this code could be improved2 but that's not the point of this post. But please, always achieve your use case, identify areas of improvement, refactor and repeat.
The result
By adding ~20 lines of JavaScript we can now say we have 100% of the Scrollspy done. The active class is interactive, it gets updated when we click and when we scroll.
Conclusion
This solution provides a simple and clean way to achieve something that could seem difficult at first. It's highly maintainable as it has little to no code. So I hope this works for you the next time you're in a SCRUM grooming session and a Scrollspy feature comes up.
📝 Important notes
- The "invisible line" can be easily moved around the viewport by changing the negative root margins if and only if the sum is always
-100%. For instance:rootMargin: 0% 0% -100% 0%<- line at the very toprootMargin: -50% 0% -50% 0%<- line in the middlerootMargin: -100% 0% 0% 0%<- line at the very bottom- If you want to find the right config and positioning I highly recommend the IntersectionObserver Playground to explore different options.
- Intersection Observers have
unobserveanddisconnectmethods. So always remember to call this methods when your Scrollspy navigation unmounts or destroys itself - For this example I assumed that
rootMarginTop: -5%(thusrootMarginBottom: -95%) is the right distance from the top to detect the section change. Nevertheless this is not exact. A more accurate way to do this would be to calculate the nav height and and use thosepxunits for therootMargin. The gotcha here is that the Intersection Observer is read-only after being instantiated. This means that unfortunately doingobserver.rootMargin = {...};is not allowed. Therefore, if your navigation height changes depending on the breakpoint, you'd need to disconnect the observer, destroy it, calculate the nav height and instantiate a new one with the right configurations - It might be obvious but
rootMarginTopandrootMarginBottomdon't exist, I just used it to be obvious about what the values were affecting. The right way isrootMargin: <top-value> <right-value> <bottom-value> <left-value>and using the same units
Footnotes
1Scroll listening is an expensive event and there are several recommendations to follow when listening to it. Some of them are:
- Throttling the callback
- Using the
requestAnimationFrameAPI to not only debounce it but to access properties that will cause a reflow - Knowing your way around Chrome DevTools to detect bottlenecks
2There are several things to keep in mind when dealing with functions that are going to get call repeatedly like the Intersection Observer callback. To name a few:
- Consider guard clauses to exit early
- Avoid querying the DOM every time. So consider saving those elements in memory
- Memoization(?)