A graphical introduction to the Intersection Observer API.
A practical introduction about the Intersection Observer, how it works and how to leverage some of its different options and methods.

I am a Venezuelan Software Engineer passionate about the web. Technology Director at Huge. Obsessed with building incredible UX with great performance numbers following web design patterns.
This post is the first of a series about the Intersection Observer. Here, I'll cover crucial concepts about the IntersectionObserver and different basic configurations that will help you leverage this handy API and potentially understand why isn't the observer behaving as you intend it to.
🚀 The power of the Intersection Observer
The Intersection Observer is a Web API that facilitates detecting intersections between elements and the viewport or any of their ancestors. This provides a practical way to implement lazy loading for images, dynamic imports based on scroll, scroll-spying navigation bars, custom analytics events, among others. This API encapsulates a lot of logic that before its time a developer would’ve had to build from scratch (read more on the appendix).
The Intersection Observer hides many implementation details and encapsulates them into a class: IntersectionObserver.
By instantiating an IntersectionObserver you get an instance of an observer that knows how to detect intersections between a target element and its direct or indirect parent, being the browser viewport the highest level one (and the default). All of this based on a configuration object. Here is when things start to get tricky, so let's cover some important concepts.
Important concepts
👀 Observer
An instance of the IntersectionObserver that will be detecting intersections of a target within a root.
🎯 Target
The element being observed by the observer. One observer can observe several targets, and one target can be observed by multiple observers.
🌳 Root configuration (root parameter)
The ancestor used to detect the intersection. In order for an intersection to happen the target needs to be a descendant of the root. By default, the root is the viewport, and it looks like this:
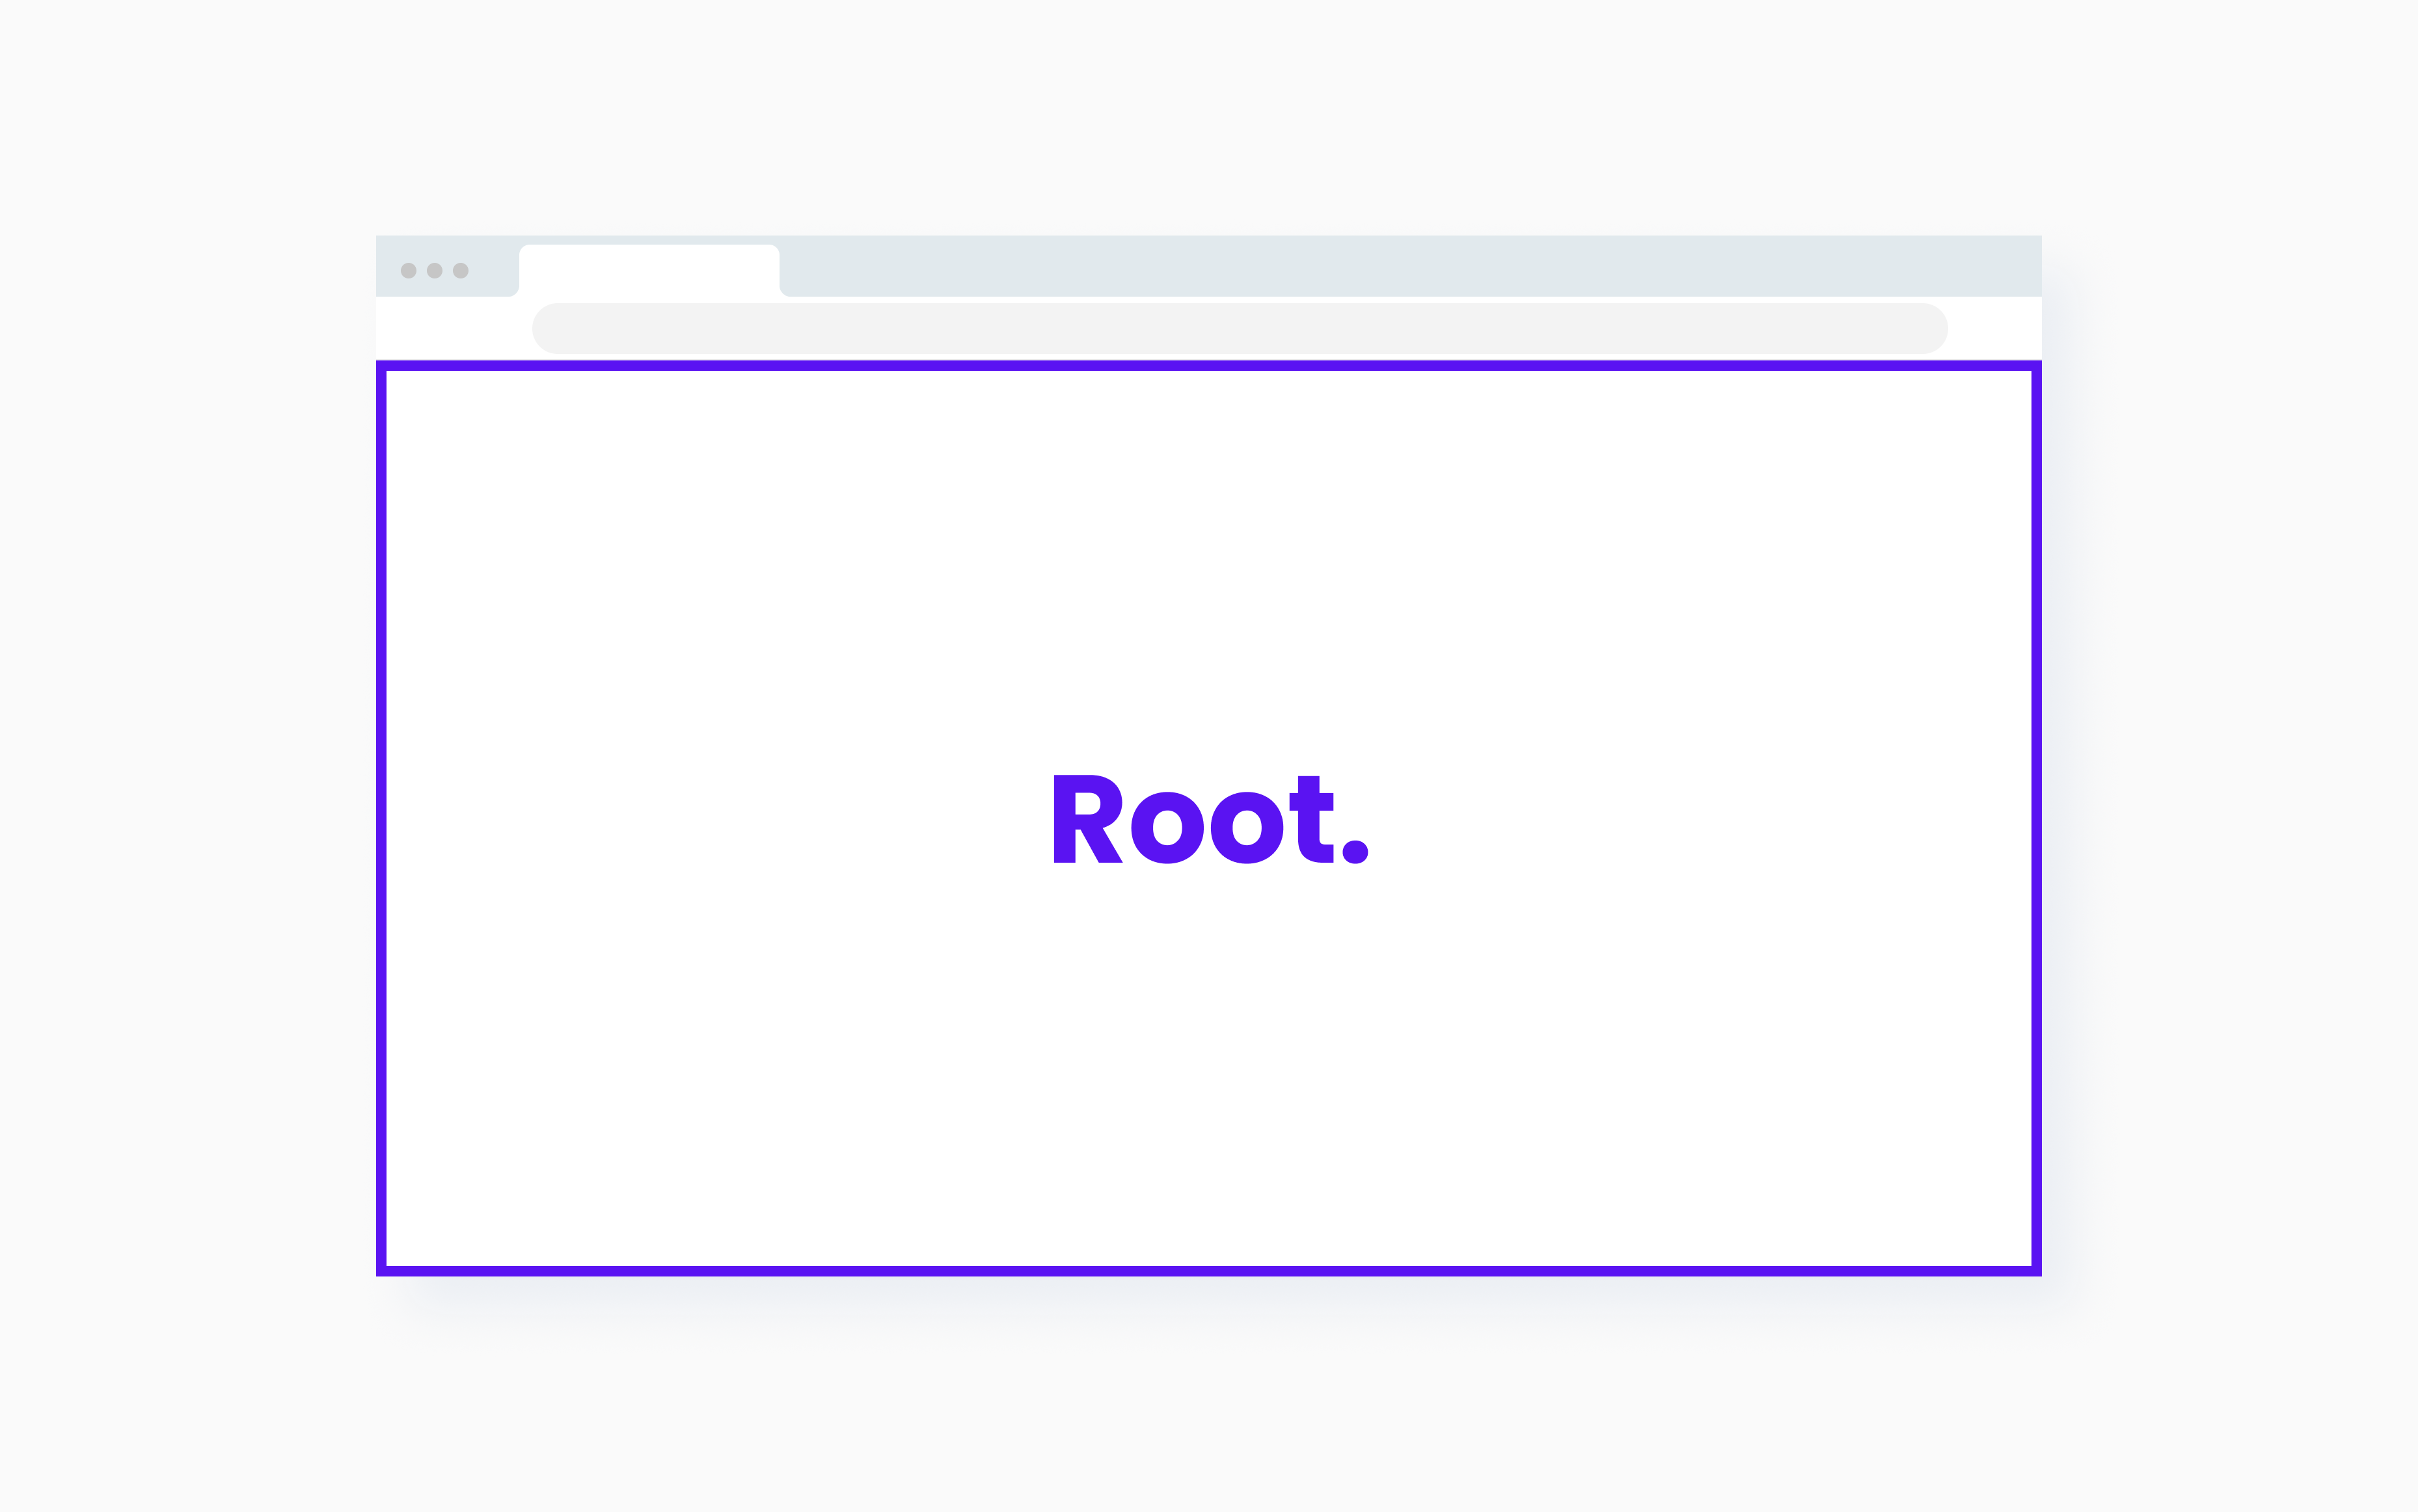 The viewport is the default root of the Intersection Observer. For most of the cases, using the default will suffice to solve your potential use case.
🌗 Threshold (threshold parameter)
Picture this as a sort of checkpoints along the area of the target. This checkpoints could be any value between 0.0 and 1.0. So let's explore some scenarios:
threshold: 0will trigger the callback only when the intersection of thetargethappens and 99.99% of its area is outside of therootareathreshold: 1will trigger the callback only when the intersection of thetargethappens and 99.99% of its area is inside of therootareathreshold: 0.5will trigger the callback only when the intersection of thetargethappens and ~50% of its area is inside of therootarea
One important point here is that the IntersectionObserver only triggers the callback when intersections are happening.
So let's zoom in here to see in a more graphical way how different threshold configurations affect when the callback gets executed:
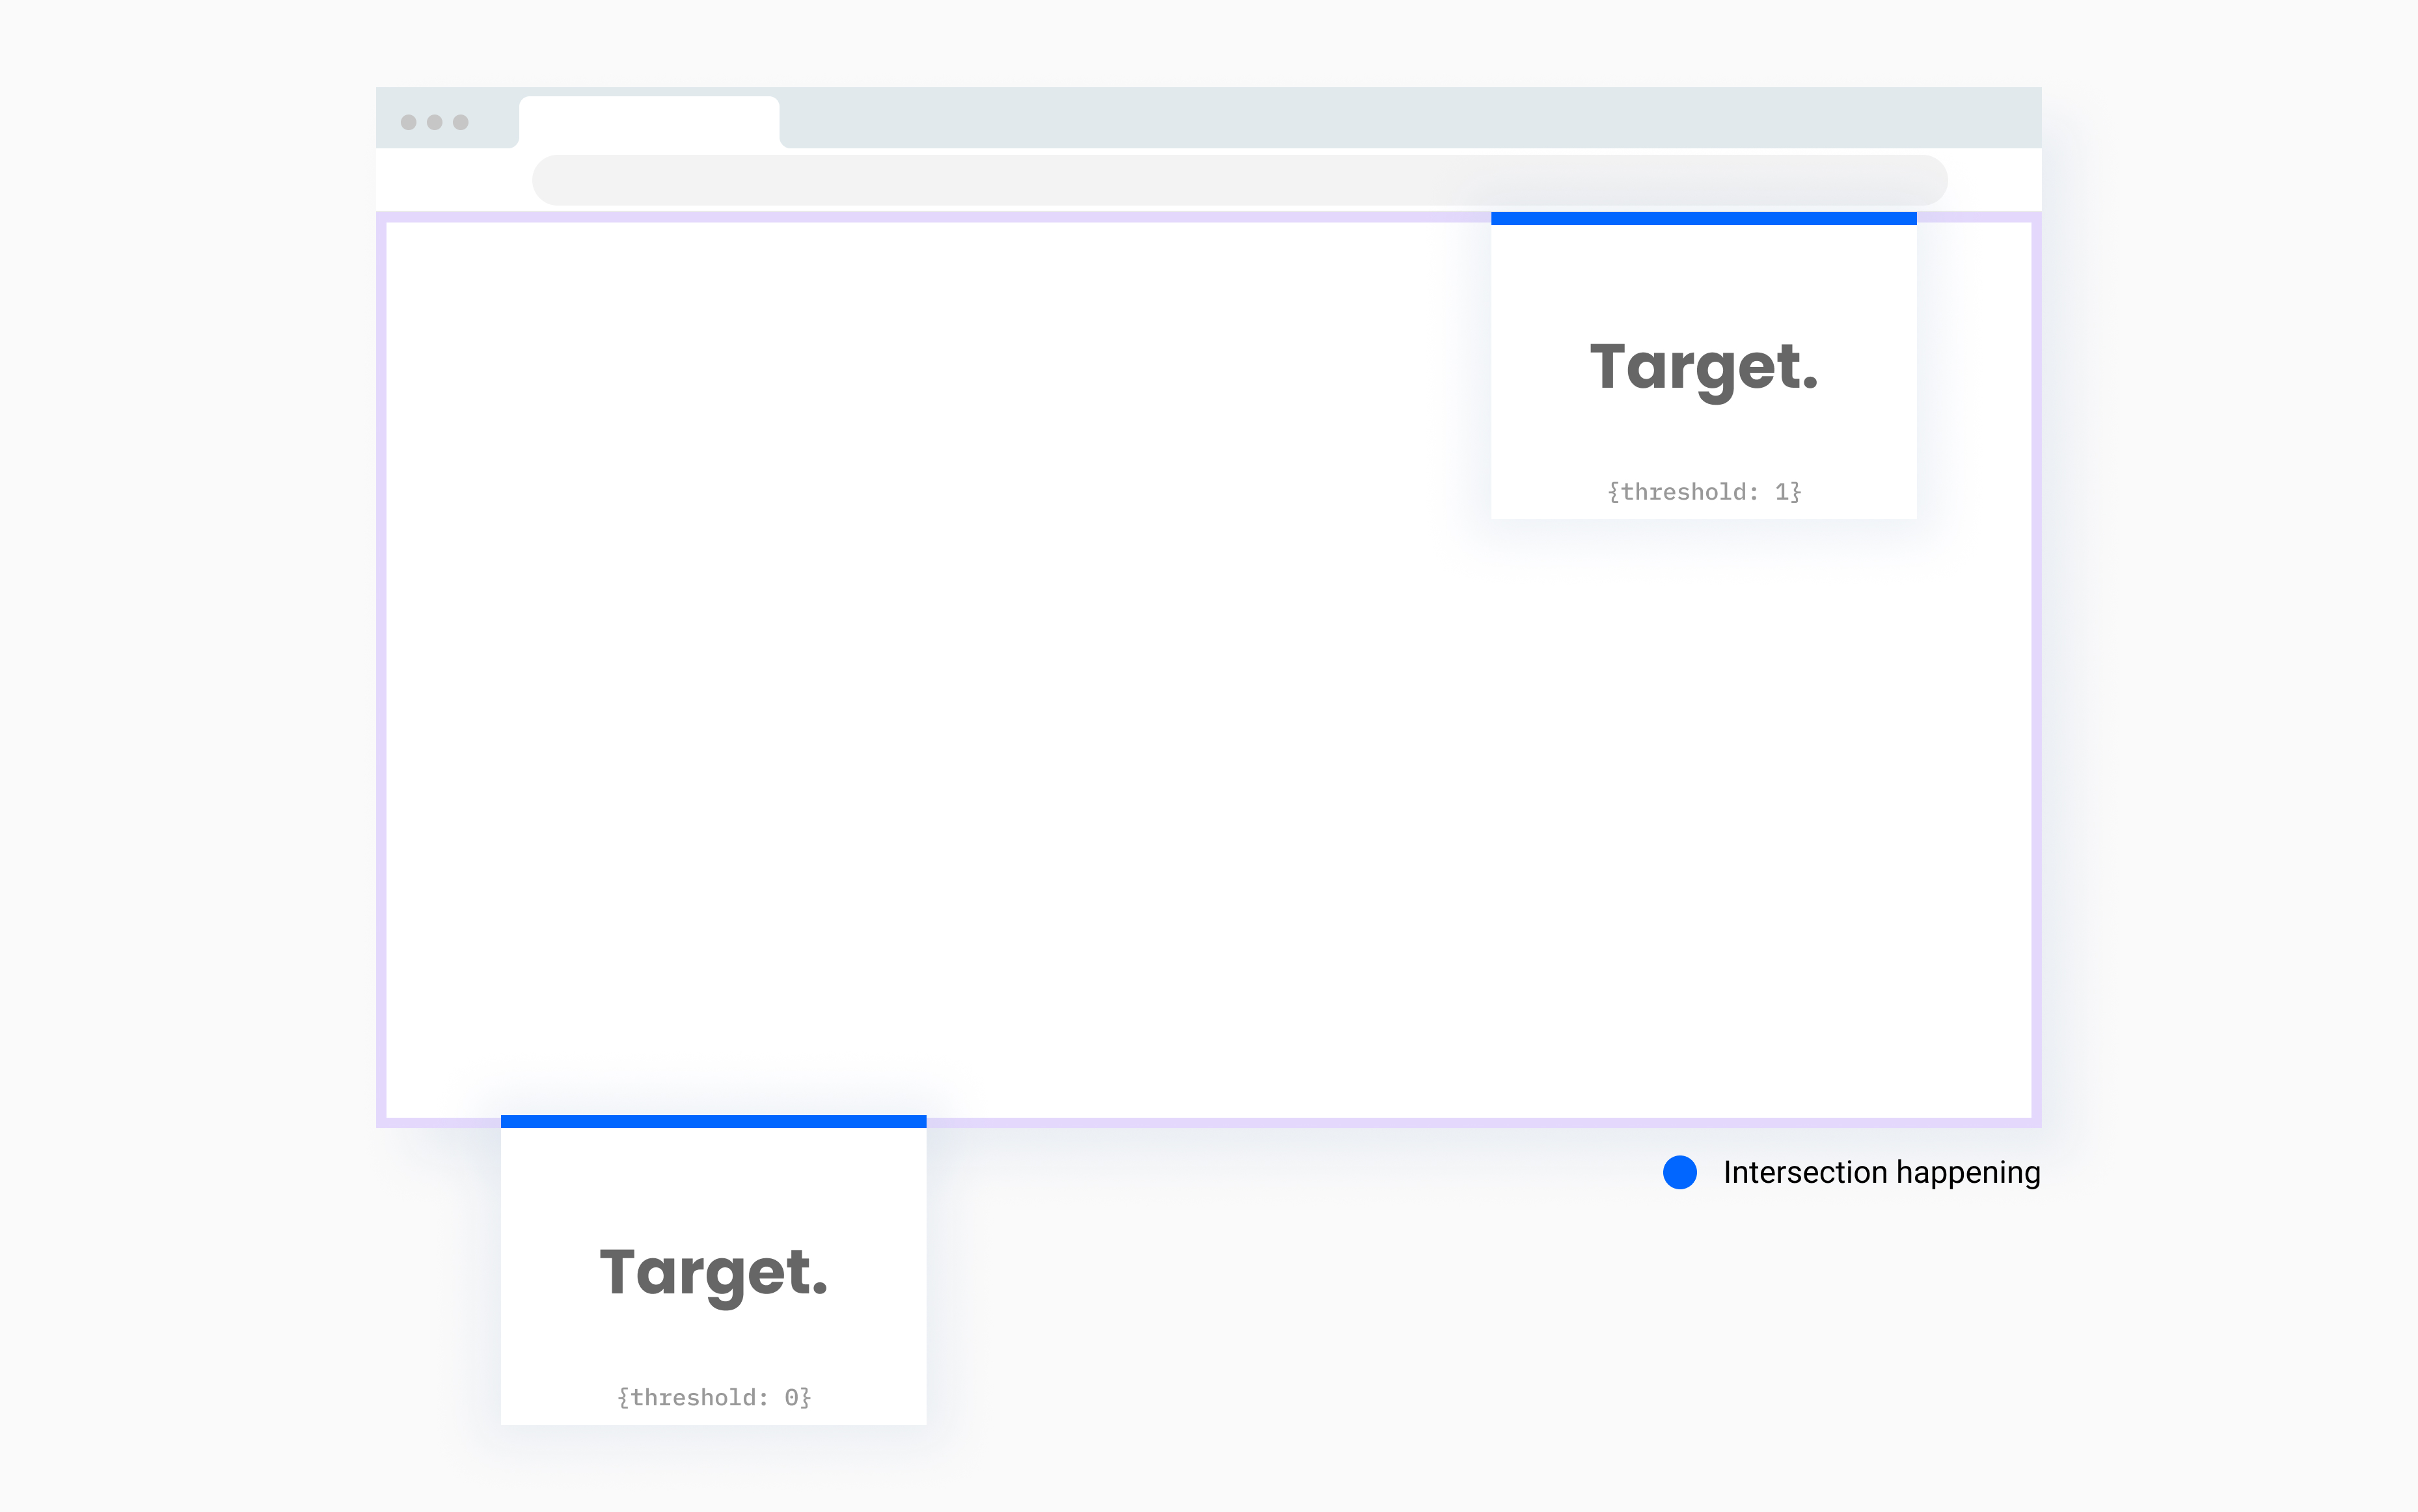 In this image there are two different
 IntersectionObserver instances with two different configurations:
- The bottom left-hand side
targetwill trigger an intersection (and execute the callback) as soon as it starts to peek. Its config:{threshold: 0} - The top right-hand
targetwill trigger an intersection (and execute the callback) when it is completely visible. Its config:{threshold: 1}
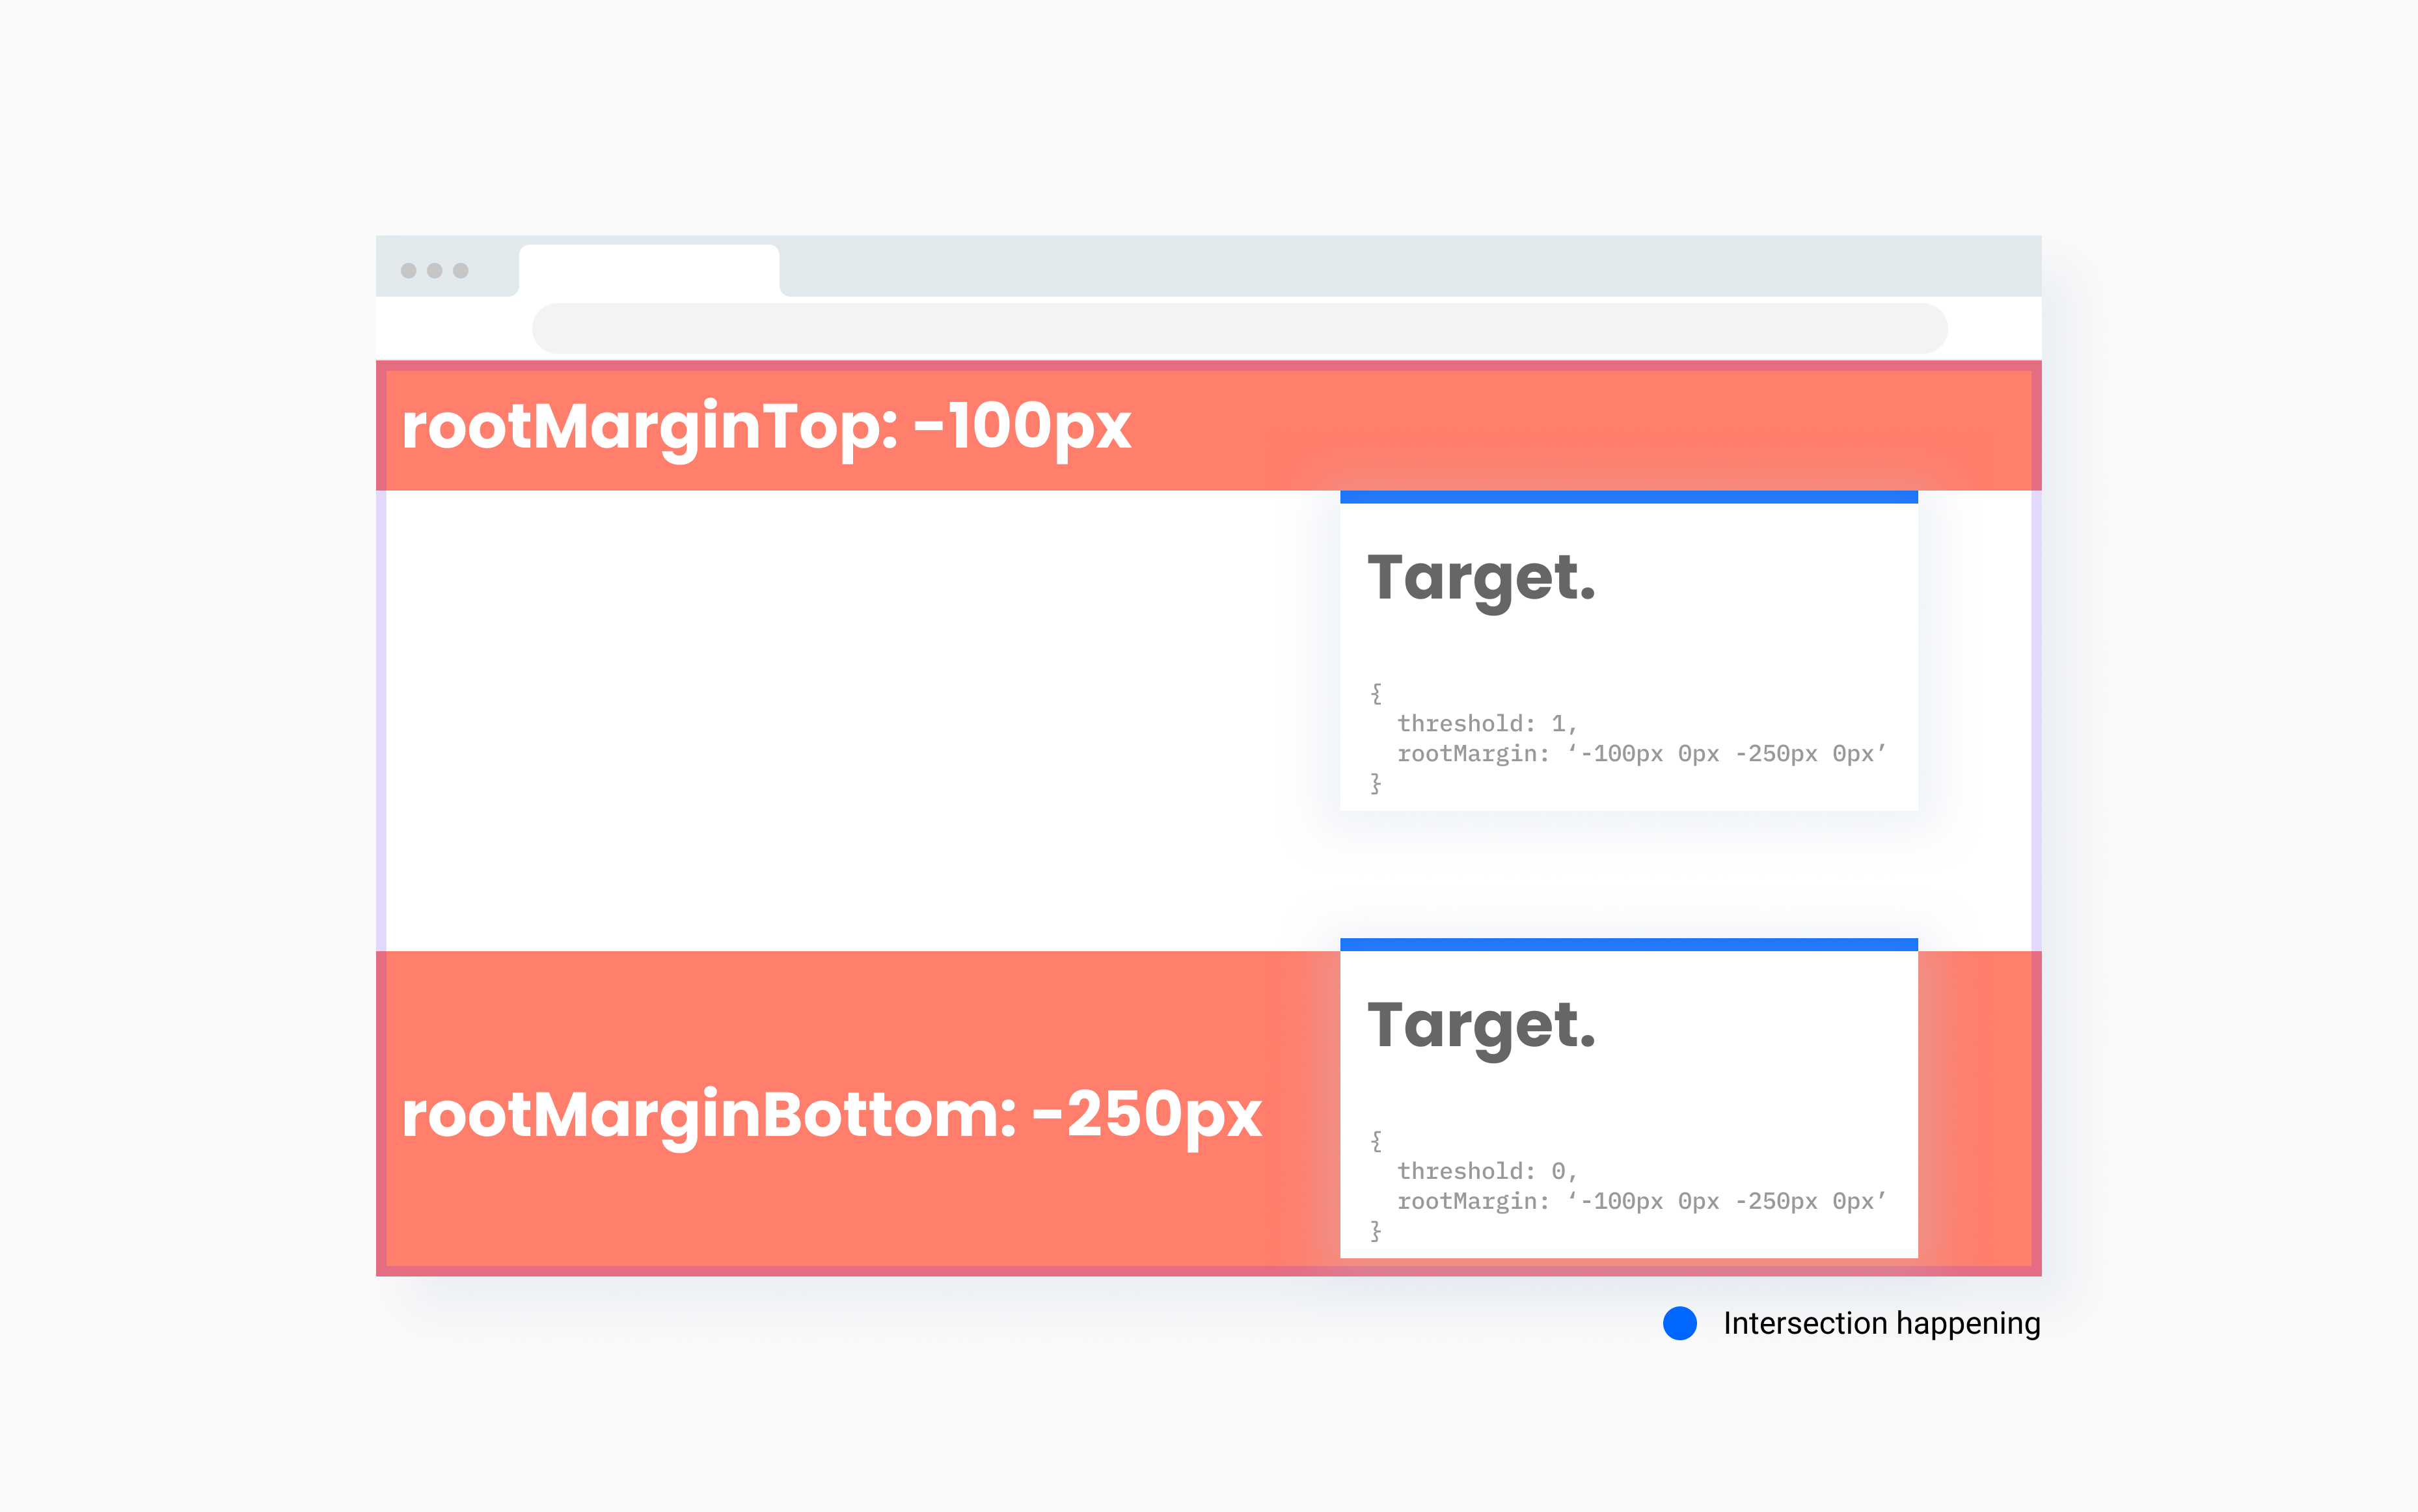
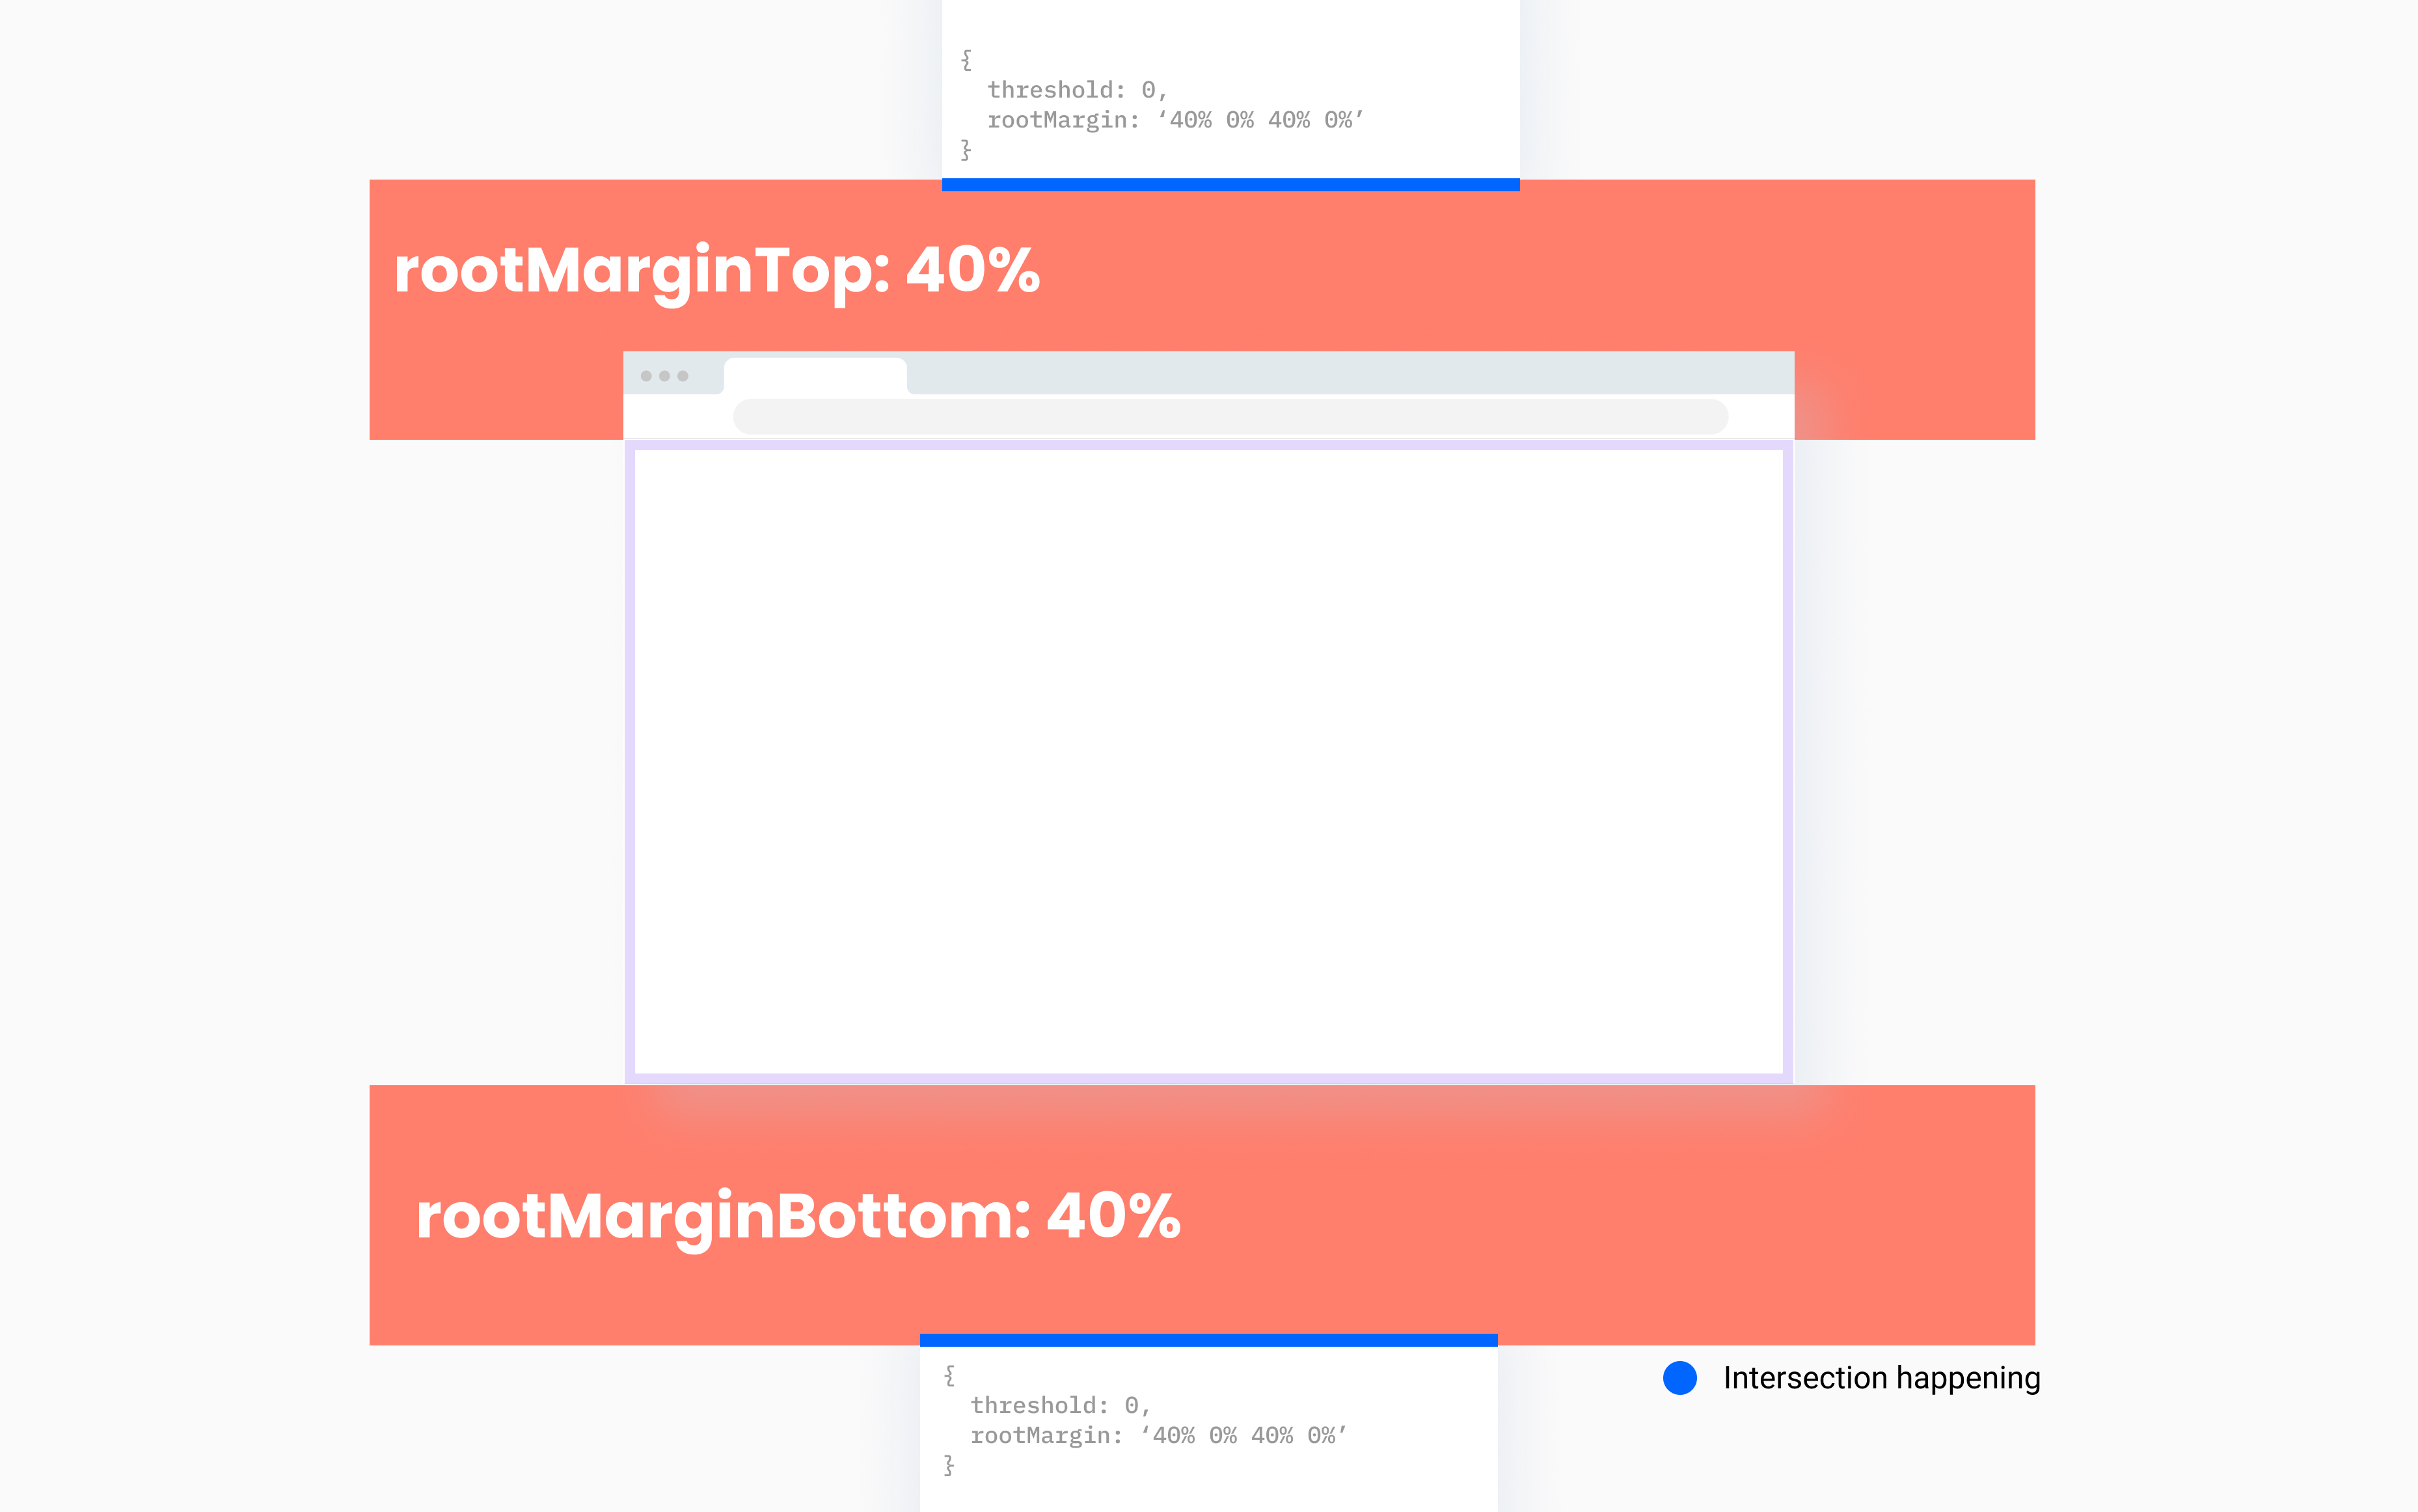
↕️ RootMargin (rootMargin parameter)
Remember the CSS Box Model? Well this API applies a similar principle to the root. This provides the ability to customize where the intersections are detected. As an example let’s look at this image adding the following configuration: rootMargin: '-100px 0px -250px 0px' to the same two observers we just discussed. See where the intersections would be triggering now, compared to the previous image:
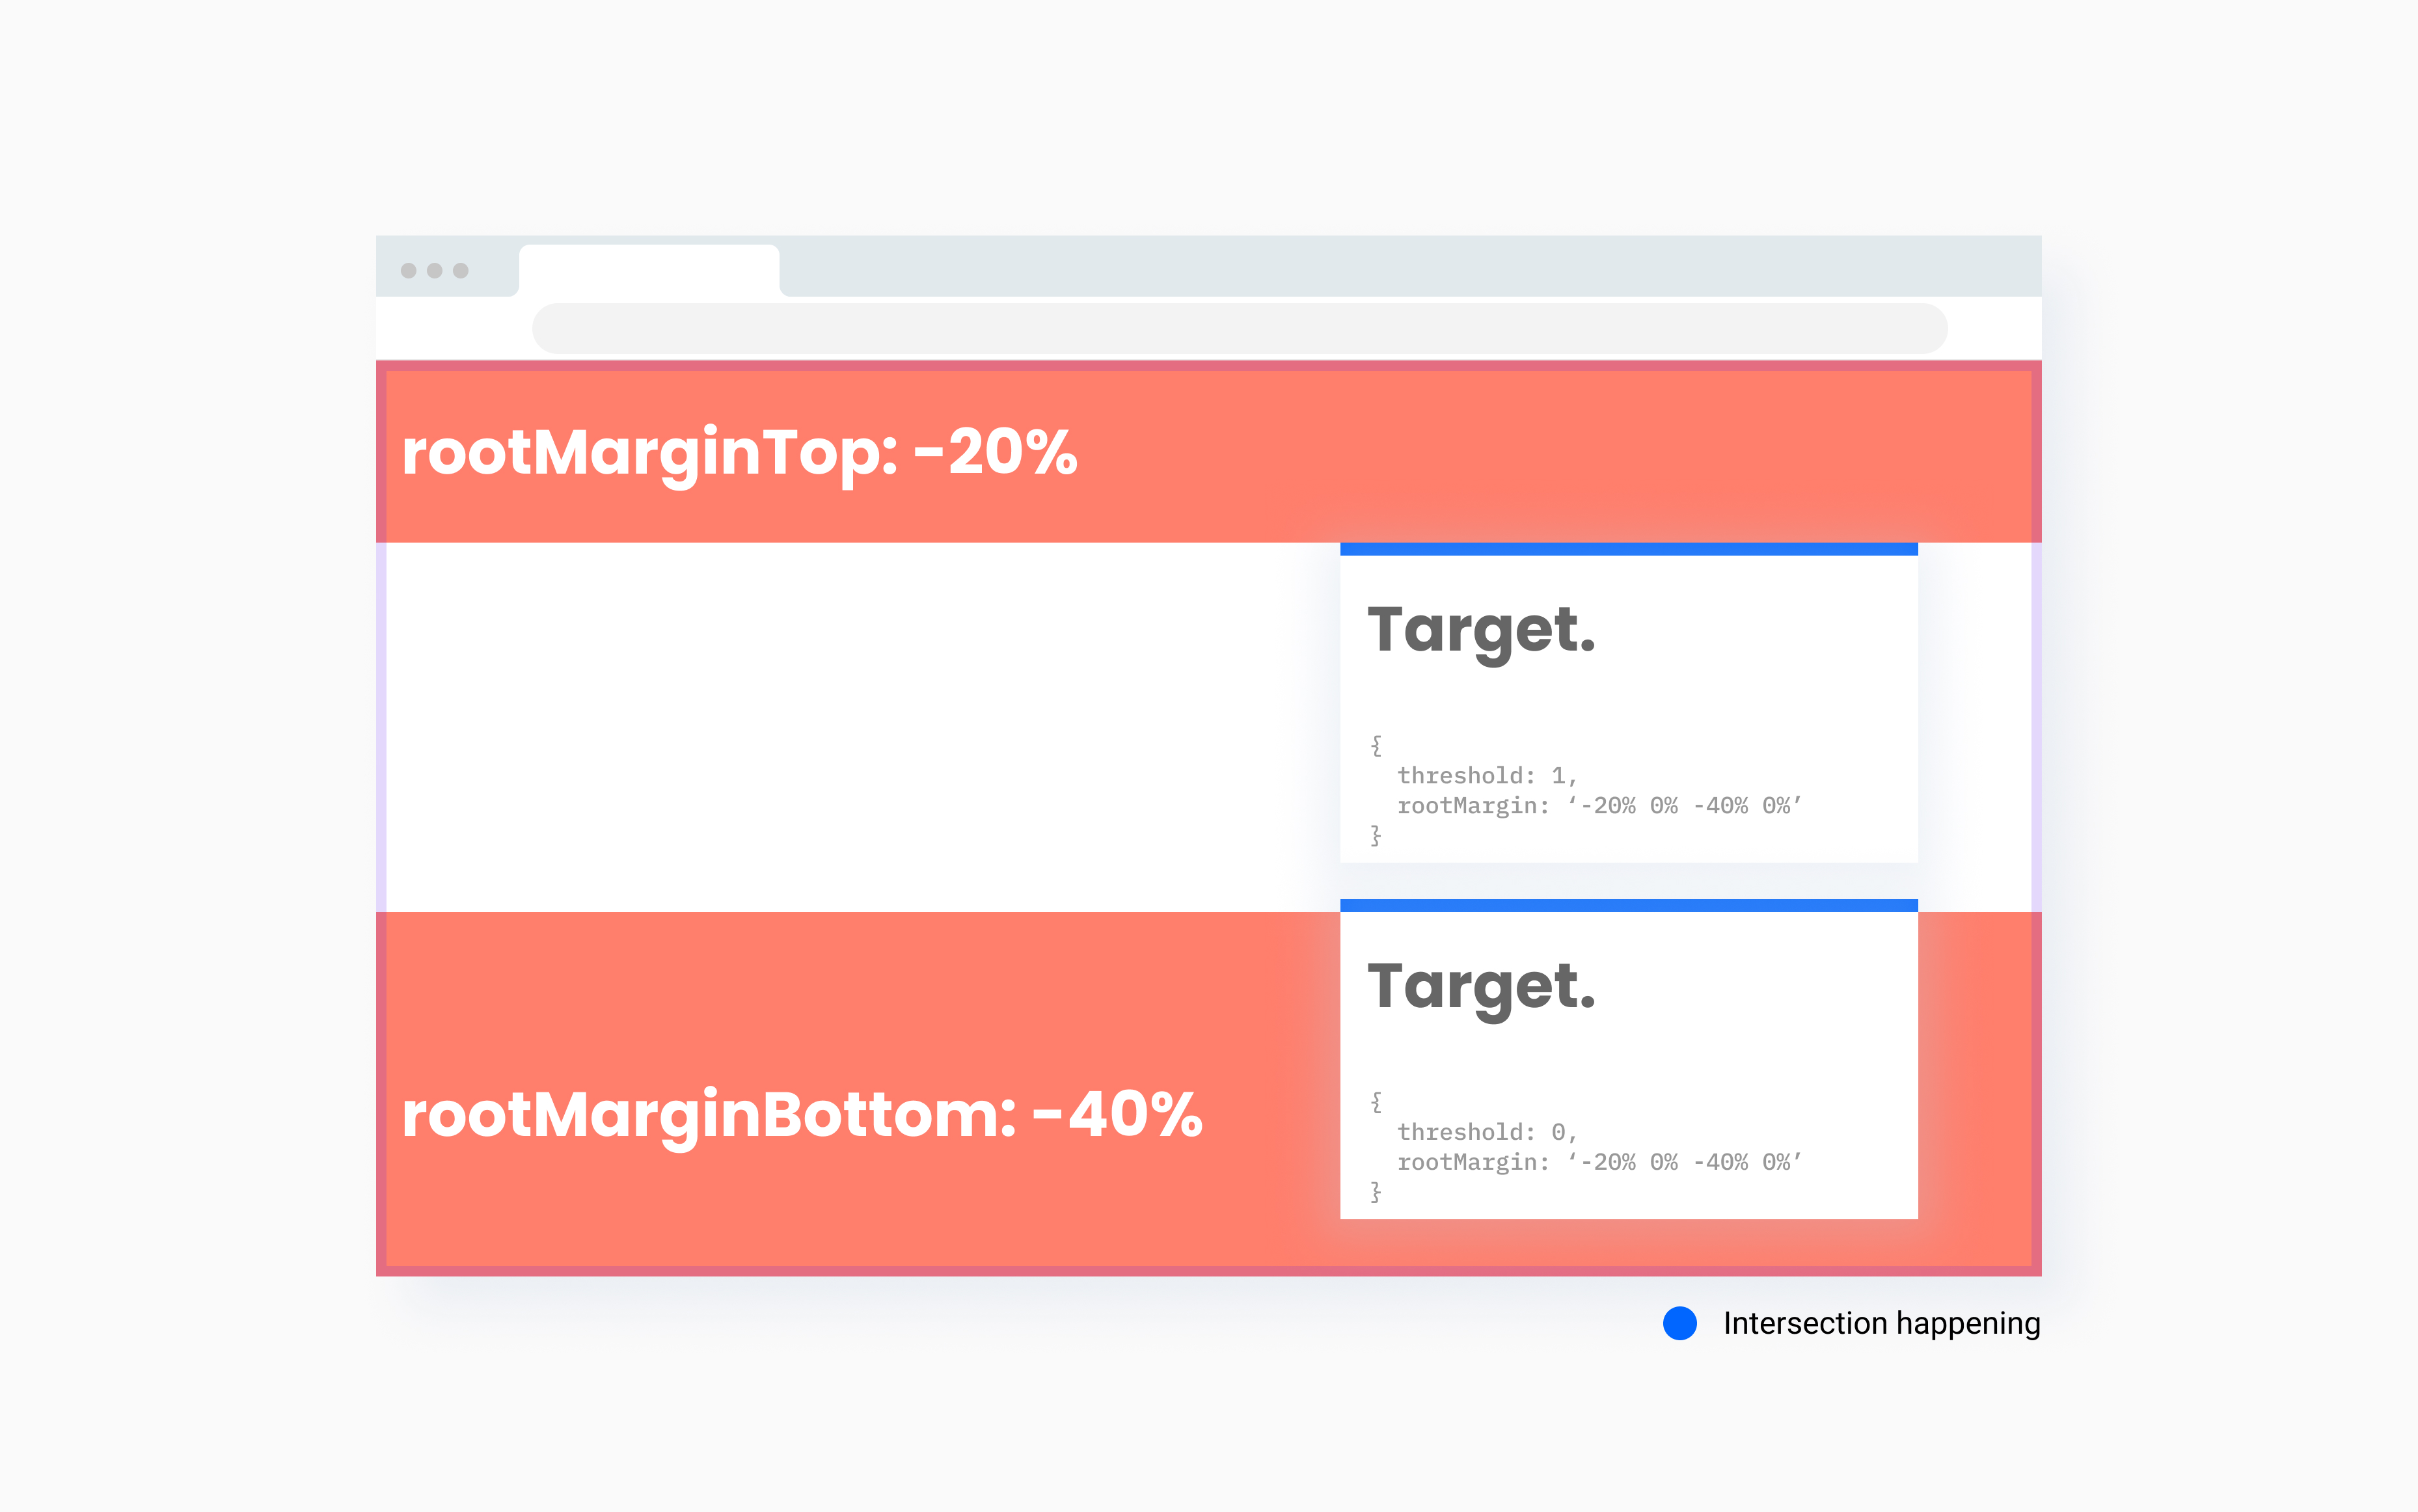
A similar result can be achieved by using percentages (%)instead of pixels (px):
 And of course, positive margins can be used as well. Now, notice how the margins now bleed out vertically from the top and bottom of the viewport:
🐞 A cool debugging tool
As you can see, the configuration affects drastically how the IntersectionObserver behaves. This is why I took the time to build a tool to better understand its behavior and provide an easy way to try different configurations by using UI controls. It’s mind blowing to see how a simple 1 instead of a 0 as threshold impacts the functioning of this powerful API. The Intersection Observer Playground looks something like the following GIF (or GIF, I don’t know how to pronounce it 😅):
The scope of this tool is to showcase how a threshold: 0 or threshold: 1 interacts with negative root margins (using either pixels or percentages). Hopefully, after reading all of the above, these terms might sound familiar and are easy to identify.
Using the Intersection Observer
The minimum you need to do to use this API is to instantiate an observer and observe a target:
const callback = (entries, observer) => {};

/*
 * Not passing any options so it uses the defaults:
 * {threshold: 0.0, rootMargin: '0px 0px 0px 0px'}
 */
const observer = new IntersectionObserver(callback);

const target = document.querySelector('.foo');
observer.observe(target);
After reading this quick snippet, let's go quickly from bottom to top.
The observe method
This method is telling the observer to track the target and make sure that if an intersection happens, the callback gets executed. The observer instance is running based on the options injected when instantiated.
If multiple targets were needed to be tracked, this could be easily changed to something like:
const multipleTargets = [...document.querySelectorAll('.foo')];
multipleTargets.forEach((target) => observer.observe(target));
Using document.querySelector
I am guessing that if you're here, you are already familiar with this. If not, this is the way to query elements from the DOM. Here's some helpful documentation about the querySelector on MDN.
Instantiating the IntersectionObserver
When you new the IntersectionObserver you can ignore the second parameter options and just pass the callback. But if you really want to squeeze its capabilities, here is where you can configure the observer behavior. One quick example based on our previous examples:
const observer = new IntersectionObserver(callback, {
  threshold: 1,
  rootMargin: '-100px 0px -250px 0px'
});
Now if you get a hold of this variable observer you can use it later in time to observe newly generated elements, or different ones.
The callback function
The callback–as you would expect–is asynchronous and can be as simple as a good old JavaScript function that receives two parameters:
const callback = (entries, observer) => {
  entries.forEach((entry) => {
    // Validate the entry's intersection here and make decisions.
  });
};
Parameters
entries: a list ofIntersectionObserverEntryobjects. In other words, a list of the elements being observed having an intersection accompanied with relevant data to make decisions about the intersection (i.e.isIntersecting,intersectionRatio,target, among others).observer: the instance of theIntersectionObserverobserving the element which just detected the intersection. Mostly used tounobserveif the action was a one-time thing.
The callback is where all the magic happens. Here you'll get notified about targets that are intersecting based on the options configured. But it's important to know that the callback will be executed in two scenarios:
- Right after calling the
observemethod, the browser will try to find an idle period and will execute the callback regardless of whether thetargetintersects or not with theroot. This will provide the opportunity to detect early elements intersecting (or not) and make a decision based on theIntersectionObserverEntryparameters. This will happen only once - Every time the
targetintersects with therootbased on the options configured. This can happen multiple times
The IntersectionObserverEntry
Whenever the callback gets executed, an array of entries will be received. Several attributes here could be used, but for the sake of keeping it short, let’s only focus on three:
isIntersecting:booleanvalue that will be set to true if thetargetintersects with theroot.intersectionRatio:numbervalue between 0 and 1 that provides thetargetportion that’s intersecting with therootbounds. This one is useful if thethresholdwas a list of numbers.target:elementwhere an intersection with the root has been detected.
Having said that, how could you detect elements about to be visible and add a class to make them fade in as soon as they start to enter the viewport? Well, it could look something like this:
const callback = (entries, observer) => {
  entries.forEach((entry) => {
    if (entry.isIntersecting) {
      entry.target.classList.toggle('foo--visible');
    }
  });
}

const observer = new IntersectionObserver(callback, {
  threshold: 0,
  rootMargin: '-100px 0px -100px 0px'
});

const elementsAboutToBeVisible = [...document.querySelectorAll('.bar')];
elementsAboutToBeVisible.forEach((element) => observer.observe(element));
Now as a final touch, we could stop observing this element as it's now visible and we don't need to interact with its intersections any longer. So quick update:
const callback = (entries, observer) => {
  entries.forEach((entry) => {
    if (entry.isIntersecting) {
      entry.target.classList.toggle('foo--visible');

      observer.unobserve(entry.target); // <-- Nice addition 😎
    }
  });
};
...
The unobserve method
This method is the opposite of observe. This means that we can stop tracking a previous target. So, in our previous example, first you observe, detect intersections and then unobserve to not waste precious JS processing times executing unneeded callbacks.
Summary
By understanding the different concepts we’ve just covered, you should be able to achieve a myriad of creative solutions and interactions to simple and complex problems. There are limitless combinations that can be done between the threshold, the rootMargin, and the implementation of the callback. Hopefully this post encouraged you to explore some of this use cases. Feel free to poke around the Intersection Observer Playground to interact with different configurations and learn more about them.
Stay tuned for the next posts in the series. As I intend to to dig deeper on the Intersection Observer capabilities, explore interesting use cases and hopefully apply some interesting principles to increase its reusability across your codebase.
Appendix
💾 Life before the Intersection Observer
I want to acknowledge how life was before this API existed. We know that strategies like lazy loading or scroll-spying have existed for a while, and in order to achieve this, developers had to get their hands dirty and apply several techniques and best practices to make it work smoothly and in a performant way. Some of the main complexities orbited around:
- Scroll event handling
- Avoiding Layout Thrashing
- Rendering performance
- Clear understanding of
requestAnimationFrame - Identifying Layout Problems and performance bottlenecks
After some hurdles, developers were able to achieve what the Intersection Observer seamlessly does. Now, don’t get me wrong, if you nail all of the above (and a couple more) you could create something as performant (or more 🤔?) as the IntersectionObserver. So if you’re up for the challenge, do it (let me know if this is something you’d be interested to read about in the comments). But let’s not forget that this is adding a good amount of code to your codebase, this means more code to be maintained and–hopefully–to be tested. So, pick your battles.
⛔️ Caveats
- The
callbackruns on the main thread so make sure you keep the processing light. And if you need to do a lot of legwork, try to "asynchronize" it - Remember that the Intersection Observer is not entirely supported by all browsers, although it's getting better and better. If IE is part of your browser support matrix, a polyfill needs to be implemented
- If you're thinking about using this API to implement scroll oriented animations such as parallax, you should think it twice. I'd recommend you explore other options
📑 Resources
- W3C documentation
- MDN Intersection Observer


